Thứ Năm, 30 tháng 9, 2010

New Version of TinyUmbrella Coming Soon


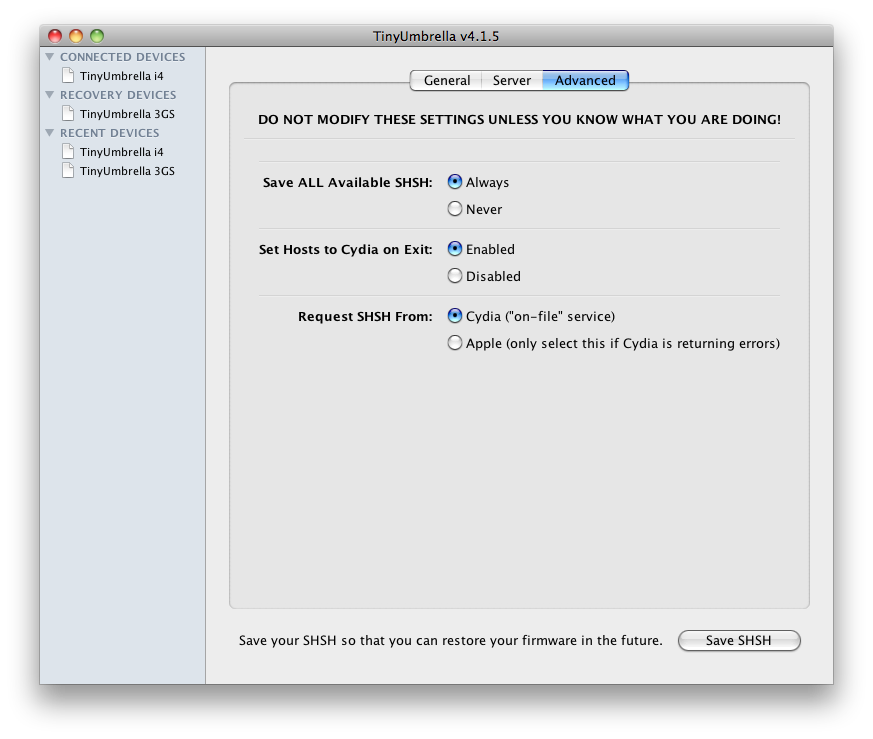
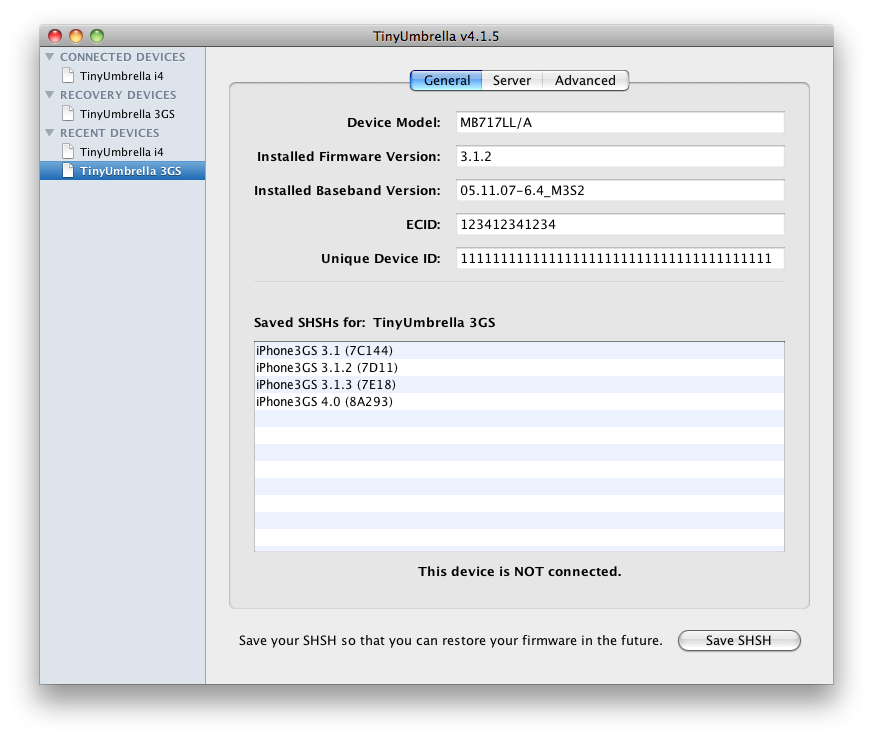
A new version of TinyUmbrella is in the works which will bring many new features and new user interface.

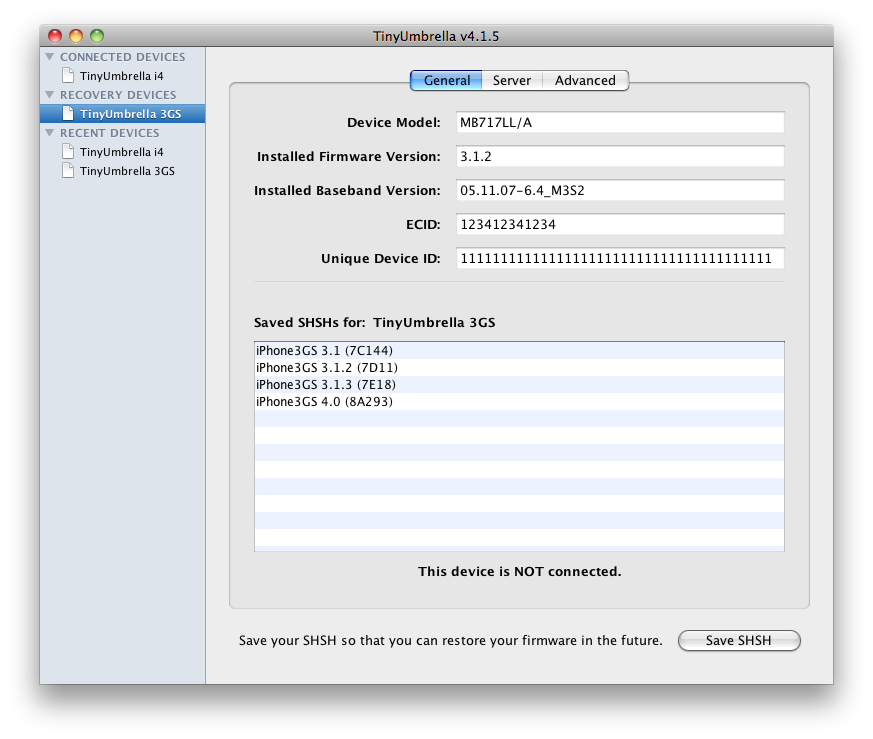
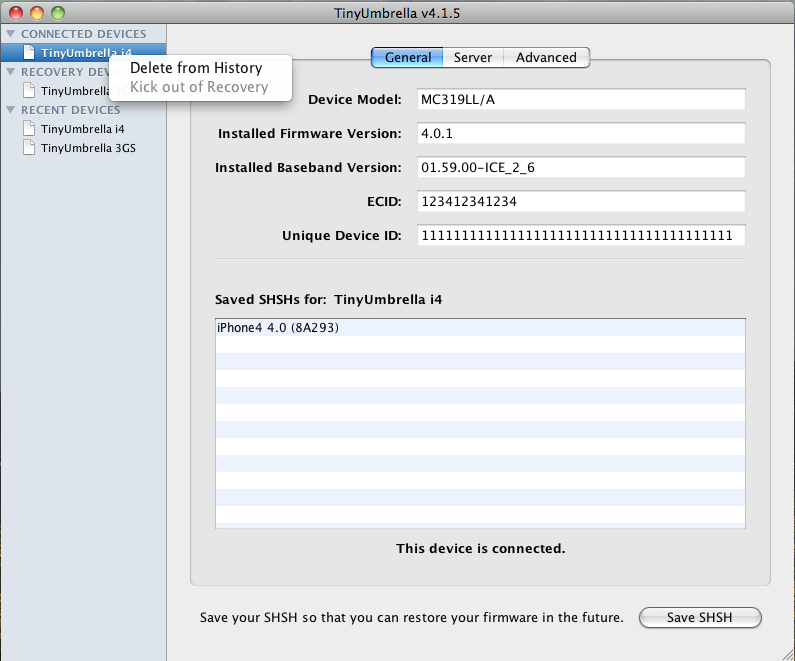
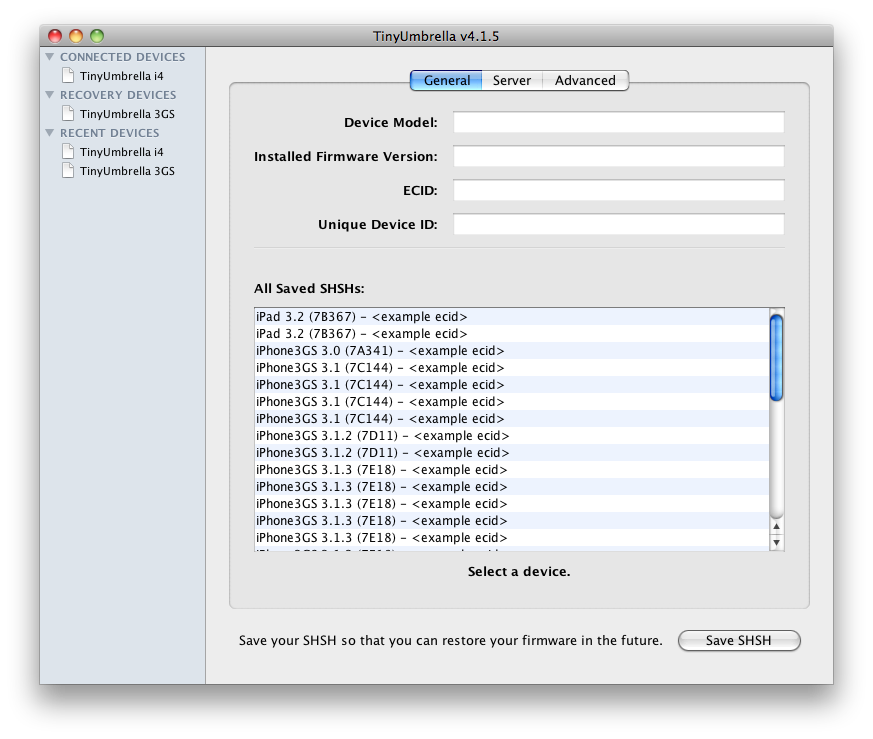
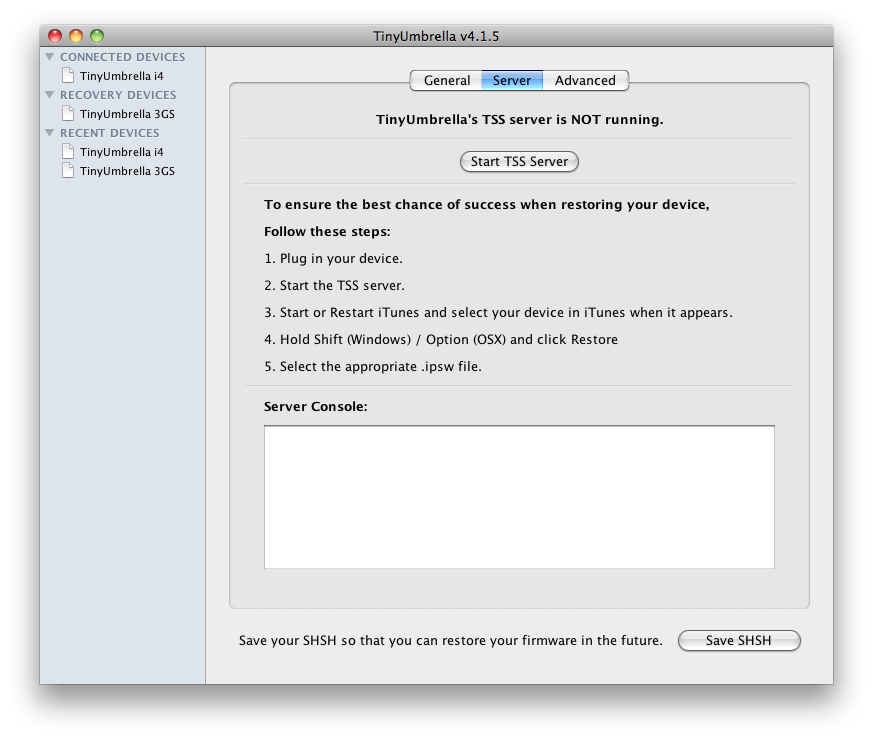
TinyUmbrella is a tool by
Semaphone which helps you save your SHSH Blobs. These blobs are necessary for downgrading the firmware of your device.

Check out some screenshots of the upcoming version below...


Thứ Tư, 29 tháng 9, 2010

More New Features in iOS 4.2 Beta 2


In addition to the new multitasking animation found in iOS 4.2 Beta 2 there are other new features including:

● Mobile App Store shows Game Center icon in description of apps that support it


● New YouTube upload options (Public, Unlisted, Private)


● Better memory usage (iPad)

iPad Gets New Multitasking Animation in iOS 4.2 Beta 2 [Video]


Apple today released the second beta of iOS 4.2 which features a new multitasking animation for switching between apps.

9to5Mac has done a nice video demonstrating the feature. You can view it below...


Apple Releases iOS 4.2 Beta 2, iTunes 10.1 Beta 1 to Developers


Apple has released iOS 4.2 Beta 2 and iTunes 10.1 Beta 1 to developers.

The new SDK is build 10M2409 and the new firmware is build 8C5101c. iOS 4.2 will unify the operating system of the iPad and iPhone.

If you find any new features please let us know in the comments.


Thứ Hai, 27 tháng 9, 2010

How to Enable Game Center and HDR Photos on Your iPhone 3G, 3GS


These are instructions on how to enable Game Center and HDR photos on your iPhone 3G and HDR photos on your iPhone 3GS.

You will need to be
jailbroken on the iOS 4.1 firmware to continue.

There is no Game Center application on the iPhone 3G! You have to copy it the Game Center App by yourself to get Game Center working. This just enables the function! Enables HDR images in the camera app for the iPhone 3G and the iPhone 3Gs and GameCenter for the iPhone 3G via WinterBoard. Please note: This package has 3 things to enable. HDR, GameCenter and both. Don't use HDR and the GameCenter enabler, because it won't work. Use the 3rd enabler (HDR/GameCenter enabler) for both.

Step One
Press to launch
Cydia from your Springboard.


Step Two
Press the
Sections tab at the bottom of the screen.


Step Three
Press to select
Tweaks from the list of Sections.


Step Four
Press to choose
HDR/GameCenter Enabler from the list of Packages.


Step Five
Press the
Install button at the top right of the screen.


Step Six
Press the
Confirm button to begin installation.


Step Seven
Once installation has completed successfully click the large
Reboot Device button.


iPhone Dev-Team Demos SHAtter Jailbreak for iOS 4.1 [Video]

The iPhone Dev-Team has published a video demonstrating the upcoming SHAtter jailbreak for iOS 4.1.
The exploit (and payload) was developed by @pod2g a few months after @p0sixninja of the Chronic Dev Team discovered the crash. That team is hard at work bringing you a brand new tool to make use of the exploit. It’s not the sort of thing that can be developed overnight so please be patient while waiting for any announcements from them.

In the meantime, we’ve put @pod2g’s exploit into a beta version of PwnageTool to test the waters. The SHAtter exploit was enough to convince the iPod touch 4G to restore to our custom IPSW. The successful result is shown below!

Although PwnageTool was a useful first test of a full iPod 4G jailbreak via SHAtter, it’s really overkill compared to the faster tools being developed. Its main use in PwnageTool will be for those with iPhone4’s, to allow updates while preserving the baseband and ultrasn0w carrier unlock. In any event, this is another exciting time for iPhone and iPod touch users…the cat and mouse game continues!


The PwnageTool beta is for internal testing only. You can take a look at the video demonstration below...
Read More


Thứ Ba, 21 tháng 9, 2010

Pod2G Finds Another Exploit to Jailbreak iPod Touch 2G


Pod2G has found another exploit for the iPod touch 2G that may be used to provide a jailbreak for both MC and non-MC models.

A heap overflow exists in the iPod touch 2G (both old and new) bootrom's DFU Mode when sending a USB control message of request type 0xA1, request 0x1.

On newer devices, the same USB message triggers a double free() when the image upload is marked as finished, also rebooting the device (but that's not exploitable because the double free() happens in a row). posixninja analyzed and explained this one.


Pod2G Leaves the Chronic Dev Team


Pod2G, the hacker who discovered the upcoming SHAtter jailbreak , has announced that he is no longer part of the Chronic Dev Team.

From now on, I'm not affiliated with chronic dev team anymore. I'm now working independently.


This is not a big deal for final users at all, as I gave details of my SHAtter exploit to both chronic and iphone dev teams !

To clarify: I'm an exploit maker, not a jailbreak tool developer. SHAtter is my 3rd bootrom exploit (24Kpwn was a team effort tho).

We aren't exactly sure what caused the separation; however, as he noted about this should not affect end-users looking to jailbreak.


RedSn0w Updated to Jailbreak iOS 4.1 on iPhone 3G, iPod Touch 2G


RedSn0w has been updated to jailbreak iOS 4.1 on the iPhone 3G and iPod touch 2G

This is a beta release of redsn0w for the iPhone 3G and iPod Touch 2G at FW 4.1 or 4.0. It uses the same pwnage2 DFU-mode exploit that we've been using since the 2.x days. It does not include the SHAtter exploit developed by pod2g. Nothing new is revealed to Apple with this jailbreak.

IF YOU USE THE ULTRASN0W UNLOCK, PLEASE WAIT FOR PWNAGETOOL TO SUPPORT 4.1. DO NOT USE REDSN0W. That’s because to use redsn0w at 4.1, you need to already have updated to official 4.1 from Apple. If you do that, you lose the ultrasn0w unlock (possible forever).

Currently this RedSn0w 0.9.6 release is Mac OS X only; however, a Windows very will come in the near future.

You can find instructions on how to use RedSn0w
here

How to Jailbreak Your iPhone 3G Using RedSn0w (Mac) [4.1]


These are instructions on how to jailbreak your iPhone 3G on the 4.1 firmware using RedSn0w for Mac. The Windows version of this tutorial is here.

IF YOU USE THE ULTRASN0W UNLOCK, PLEASE WAIT FOR PWNAGETOOL TO SUPPORT 4.1. DO NOT USE REDSN0W. That’s because to use redsn0w at 4.1, you need to already have updated to official 4.1 from Apple. If you do that, you lose the ultrasn0w unlock (possible forever).

This tutorial can be used to jailbreak before applying the UltraSn0w unlock. You can find instructions on how to apply the unlock
here. It will also hacktivate your device for those not with an official carrier.

Step One
Create a folder on your desktop called
Pwnage

Download RedSn0w from
here and place it in the Pwnage folder. Likewise, download the latest 4.1 firmware from below and place it in the same folder.

4.1 (3G): iPhone1,2_4.1_8B117_Restore.ipsw

Extract the redsn0w app from the RedSn0w zip file by double clicking it.


Step Two
Connect your iPhone to the computer and launch iTunes.


Select your iPhone from the list of devices on the left. Now hold down
Option and click theRestore button. Restore is preferred as it won't create any wasted space on your iPhone.


Navigate to the Pwnage folder on your desktop and select the firmware ipsw. Click the
Choose button to continue.


Step Three
Once iTunes has finished updating your iPhone to the desired firmware open the Pwnage folder on your desktop and launch the
redsn0w application from the redsn0w folder we extracted earlier.


Step Four
Once RedSn0w opens click the
Browse button


Step Five
Select the 4.1/ 4.0 firmware ipsw we placed in the Pwnage folder on our desktop then click
Open.


Step Six
Once the firmware has been verified click the
Next button to continue.


Step Seven
RedSn0w will now prepare the jailbreak data


Step Eight
From this window you can select the jailbreak options you would like.


Verbose boot displays detailed information on boot of your device and is generally only needed by developers and advanced users.

Make sure
Cydia is selected. For this tutorial we will also select Custom boot logoandCustom recovery logo.

When you click to select each custom logo option a dialog window will appear asking you to select the image. Locate the image you would like to use then press the
Open button.


*Remember the rules for boot logos are: RGB or Grayscale format with Alpha channel and dimension below 320x480.


Notice that RedSn0w has already selected to Enable multitasking, Enable homescreen wallpaper, and Enable battery percentage. If you do not need multitasking we would recommend deselecting it as it makes your iPhone 3G run very slow.

Click the
Next button to continue


Step Nine
Please plug your iPhone into the computer and make sure its OFF then click the
Nextbutton


Step Ten
RedSn0w will now guide you through the steps to get into DFU mode. You can find more help with DFU mode
here


Hold down both the
Home button and the Power button for 10 seconds.


Release the
Power button and continue holding the Home button until RedSn0w detects the device.


Step Eleven
Your iPhone will now reboot


Step Twelve
RedSn0w will then begin uploading the new RAM Disk and Kernel.


Step Thirteen
Once this is complete you will be notified that RedSn0w is done. Click the
Finish button. When your iPhone finishes rebooting (5 minutes or so) it will be jailbroken with Cydia on the SpringBoard.


*As usual a big thanks to the iPhone Dev-Team for their hard work and contribution to the iPhone community.

Bài đăng phổ biến